
English
Views: 0 Author: Site Editor Publish Time: 2026-08-30 Origin: Site


High-performance aluminum profiles represent a significant capital investment. They offer unparalleled sleekness, structural rigidity, and longevity for modern building envelopes. However, even premium fenestration systems will fail to deliver promised thermal and acoustic performance if the installation methodology is flawed. Poor execution compromises energy efficiency, invites moisture damage, and ultimately jeopardizes the structural integrity of the frames. A successful project eliminates thermal bridging, prevents water ingress, and accommodates natural structural shifts over time. Furthermore, rigorous execution protects the long-term warranty of the fenestration system. Read on as we outline the critical evaluation points you must verify before and during the installation process. We will show project owners, builders, and contractors exactly how to guarantee a strong return on investment. You will learn to evaluate structural readiness, manage critical tolerances, and verify contractor expertise.
Every successful project begins long before you unpack the frames. Site preparation sets the foundation for weatherproofing and structural stability. You cannot correct a poorly prepared rough opening later in the process. Builders must evaluate the wall condition thoroughly.
You must evaluate the rough opening for structural integrity. The aperture must safely support the heavy weight of aluminum profiles. Installers rely on precise measurements before beginning the work. Check the opening using four primary criteria:
If you discover discrepancies, builders must apply leveling compounds or structural shims. You must rectify uneven surfaces before introducing the window frame.
Aluminum naturally expands and contracts alongside temperature fluctuations. Installers must calculate and verify expansion gaps accurately. You typically need a gap of 10 to 15 millimeters around the entire perimeter. The exact dimension depends heavily on the overall system size.
Failing to leave sufficient space leads to severe structural issues. The frame will press against the masonry during hot weather. This pressure distorts the profiles and stresses the glazing units. Installers calculate these tolerances based on regional climate extremes. They use precision spacers to hold these gaps consistent during positioning.
Water always finds the path of least resistance. You must establish robust moisture management before frame placement. Installers evaluate the implementation of several key barriers. First, they check the damp-proof courses (DPC). The DPC prevents rising damp from reaching the window sill.
Next, installers verify sill panning. A sloped sill pan directs incidental water outward. Finally, they inspect primary flashing integrations. Flashing tape must seal the rough opening completely. These layers act as the final defense against water ingress. Improper preparation here guarantees leaks during heavy rainstorms.
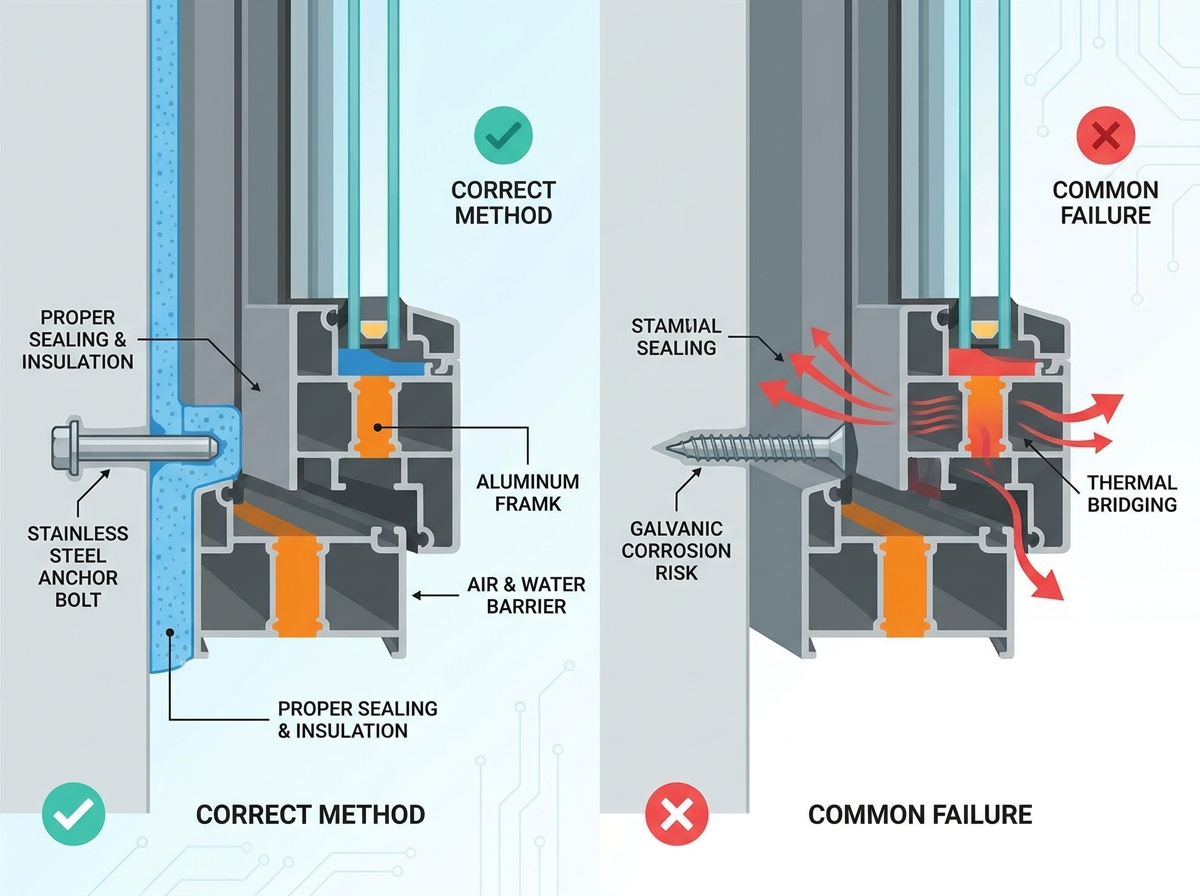
Rigorous methodology distinguishes a professional job from an amateur attempt. Certified teams follow exact manufacturer specifications. They understand how different materials interact under physical stress. Proper aluminum window installation requires strict adherence to structural and thermal guidelines.
Modern architectural profiles are exceptionally heavy. Installers must maneuver them without racking or stressing the joints. Racking occurs when the frame twists out of its square shape. This twisting breaks internal corner cleats and damages weather seals.
Teams use specialized suction lifters to transport large units. They place the frame onto pre-leveled setting blocks. These blocks support the glazing weight directly. Installers never rest the bare aluminum directly against the rough opening. They use adjustable shims to hold the unit precisely in place.
Fastener selection directly impacts both safety and longevity. You must use stainless steel or specialized coated anchors. Standard zinc screws will corrode quickly when exposed to moisture. Installers drive these anchors into the structural substrate securely. They must do so without distorting the aluminum extrusion.
Industry standards dictate specific spacing protocols. Installers follow these rules to distribute wind loads evenly.
| Fastener Location | Standard Measurement | Purpose |
|---|---|---|
| Distance from corners | 150mm (approx. 6 inches) | Prevents corner cleat damage. |
| Distance from mullions/transoms | 150mm (approx. 6 inches) | Distributes weight away from joints. |
| Maximum spacing between fixings | 600mm (approx. 24 inches) | Prevents frame bowing under wind load. |
| Depth into substrate | Minimum 40mm to 50mm | Ensures structural anchor pull-out strength. |
Thermal bridging ruins energy efficiency. Installers must seal the expansion gap perfectly. They evaluate several materials for this task. Low-expansion foams fill the cavity gently. High-expansion foams exert too much pressure and warp the frame.
Many premium systems rely on expanding tapes. Installers apply illmod tape around the frame perimeter. The tape expands slowly to fill uneven masonry gaps. It blocks wind and rain while allowing vapor diffusion. Installers also use specialized perimeter sealants. They carefully avoid damaging the polyamide thermal breaks. The thermal break separates the exterior cold metal from the interior warm metal.
Even minor oversights cause cascading failures over time. Project managers must identify risks early. They must monitor the site actively to prevent expensive callbacks. We see three common points of failure repeatedly in the field.
Galvanic corrosion destroys window frames silently. The risk emerges when dissimilar metals react chemically. This reaction requires moisture acting as an electrolyte. For example, standard steel screws interact aggressively alongside aluminum profiles.
The aluminum acts as an anode and sacrifices itself. It corrodes rapidly, turning into a white powder. Fasteners lose their grip entirely. Installers prevent this by using isolation techniques. They specify stainless steel hardware exclusively. They also use nylon sleeves to separate different metal components.
Aluminum profiles demand room to breathe. The consequences of over-tightening fasteners are severe. When installers drive screws too tightly, the frame cannot move. Packing expansion gaps too rigidly causes identical problems.
As the sun heats the metal, it expands outward. If restricted, the force redirects inward. This leads to permanently bowed frames. You will notice binding sashes quickly. Doors will scrape against the sill. In extreme cases, the pressure causes cracked glass. Best practices require slightly backing off fasteners to permit micro-movements.
Manufacturers engineer precise weeping holes into every frame. These channels direct internal condensation outside safely. Improper sealant application often obstructs these critical paths. Inexperienced workers sometimes smear silicone across the external drainage slots.
When weeping holes clog, water pools inside the extrusion. This internal frame flooding causes severe damage. It degrades the insulating glass unit seals quickly. It also causes interior wall damage as water overflows inside the room. Installers must keep sealant boundaries strictly defined.
Quality materials demand highly skilled labor. Project owners must verify credentials before signing contracts. They must also enforce strict quality control measures. These steps separate certified professionals from average tradespeople.
You should investigate an installer’s professional credentials thoroughly. Look for manufacturer-approved partner status immediately. Brands train these specific partners on proprietary extrusion systems. They know exactly how to assemble the specific profiles.
Installers must demonstrate deep knowledge of local building codes. They need to understand fenestration energy ratings completely. A certified installer guarantees compliance concerning wind load requirements. They provide documentation proving the glass meets safety glazing standards.
The handover phase requires a comprehensive evaluation. Do not accept the project without a rigorous QC walkthrough. Project owners should evaluate multiple specific dimensions.
| QC Checkpoint | Evaluation Method | Expected Result |
|---|---|---|
| Hardware Operation | Open, close, and lock all sashes manually. | Smooth movement. No friction, grinding, or excessive force required. |
| Reveal Sizes | Measure the visible gap around the closed sash. | The shadow gap must remain entirely consistent from top to bottom. |
| Perimeter Seals | Inspect the exterior silicone lines visually. | Continuous bead. No gaps, bubbles, or smeared edges. |
| Drainage Caps | Check the exterior sill weep holes. | All plastic weather caps present and entirely unobstructed by sealant. |
Manufacturers structure their warranties carefully. They protect themselves against improper handling. Documented adherence to official installation manuals is absolutely required. A premium system warranty becomes void if installers ignore these rules.
Contractors should photograph the flashing and fixing stages. This visual proof validates the manufacturer's product warranty later. If a thermal break fails, the factory will request this documentation. You must prove the opening was prepared correctly.
The installation process finishes, but care continues indefinitely. Long-term performance relies heavily on immediate post-installation protocols. Routine maintenance prevents premature wear and aesthetic degradation.
New windows remain vulnerable during ongoing construction. Builders must follow strict guidelines regarding protective tapes. You must remove factory tapes at the correct time. Leaving them on too long causes UV baking. The sun melts the adhesive directly into the powder coating.
You must also avoid aggressive construction site chemicals. Keep wet mortar, cement, and plaster away from the frames. These alkaline materials stain aluminum permanently within hours. If splashes occur, clean them immediately using ample clean water.
Establishing a baseline schedule extends the system lifespan dramatically. You should conduct maintenance twice a year. If you live near the ocean, increase this to four times.
Strict standards bridge the gap completely between a standard window replacement and a high-performance architectural upgrade. The physical profiles and glass units only perform as well as their surrounding integration. Precise aperture preparation, correct fastener selection, and meticulous weatherproofing are absolutely non-negotiable. By actively monitoring these critical phases, you protect your building envelope from leaks and thermal loss.
You must prioritize expertise over speed. We strongly prompt you to request a site audit before ordering materials. Download a detailed technical spec sheet for your chosen system today. Finally, consult directly with a certified installation team to review your specific project requirements and secure your long-term warranty.
A: A standard-sized unit generally takes two to three hours. This timeline factors in rough opening preparation, frame positioning, and comprehensive weatherproofing. Large architectural panels or complex multi-slide doors often require an entire day per unit. Weather conditions and structural modifications add significant time.
A: Yes, direct-to-masonry fixing is common, but it requires extreme precision. The masonry opening must be perfectly square and level. You must employ expanding tapes or premium sealants to bridge the gap. Sub-frames often provide better thermal isolation and simpler leveling, depending heavily on regional building practices.
A: Absolutely. The manufactured U-value assumes perfect perimeter insulation. If an installer leaves uninsulated voids around the frame, severe thermal bridging occurs. Proper expanding foam and airtight vapor tapes maintain the integrity of the polyamide thermal breaks. Poor sealing ruins the overall energy performance.
A: Several common violations void warranties immediately. Using incorrect, non-stainless fasteners causes galvanic corrosion. Making unauthorized structural modifications, like drilling extra holes through the frame, destroys thermal breaks. Finally, omitting or blocking engineered drainage paths leads to internal flooding, entirely invalidating manufacturer coverage.